
Free guide · IRCC ATIP online request
Get your GCMS notes yourself. All 24 steps.
Requesting the officer’s notes on your own visa file costs nothing under the Privacy Act, and you can do it from India without a Canadian representative. Here is the entire form, screen by screen, exactly as it appears on the Government of Canada portal.
Why a consultancy publishes the free method: filing the request is a form. Reading forty pages of officer shorthand and deciding whether your case can actually be answered is the work. If you can file it yourself, do — then bring the notes to us and skip the retrieval fee entirely.
Before you start, have these open.
Your application number
On your refusal letter and in your IRCC account. Format is usually a letter followed by seven digits.
Your UCI
The Unique Client Identifier, in ####-#### or ##-####-#### format. Also on the refusal letter.
Passport biodata scan
Under 2 MB, showing name, date of birth, photograph and signature. All pages in one file if you attach more than one.
An email you control
The release package is emailed to this address, unencrypted, in about a month. Not to your IRCC account.
IMM 5744 — only if the file is not yours
Signed and dated by hand in blue ink. All legal guardians must sign for a minor.
The program you applied under
Visitor permit, study permit, PR, and so on. Pick the one you actually applied under, not the one you wanted.
One thing this will not do: ATIP is not a status-check tool, and IRCC says so on the form itself. An ATIP request will not speed up a pending application or give you faster updates than the Application Status page.
Step by step
The whole request, screen by screen.
The portal walks through five stages — Requester Information, Act Selection, Records Selection, Attach Documents, Review and Validate. Screens verified 14 August 2026; the sample data shown is fictional.
Step 1 of 24 · Start
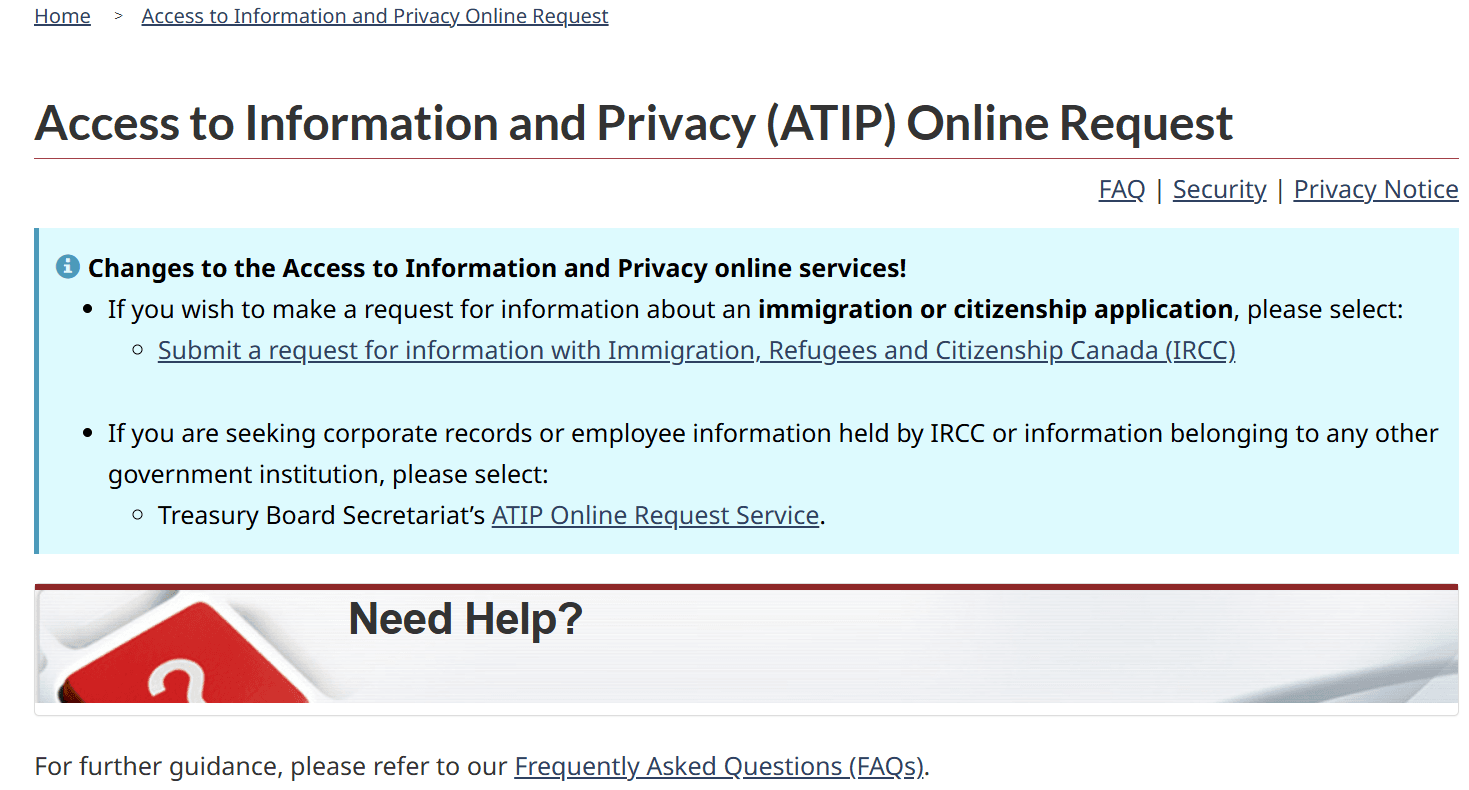
Open the ATIP Online Request page
Go to the Government of Canada ATIP Online Request service. On the landing page, choose "Submit a request for information with Immigration, Refugees and Citizenship Canada (IRCC)". The second option — the Treasury Board ATIP Online Request Service — is for corporate records and IRCC policy documents, not for your own application file.
Do not pay a third-party site to reach this form. The Government of Canada page is free to open and the Privacy Act request itself costs nothing.
Step 2 of 24 · Start
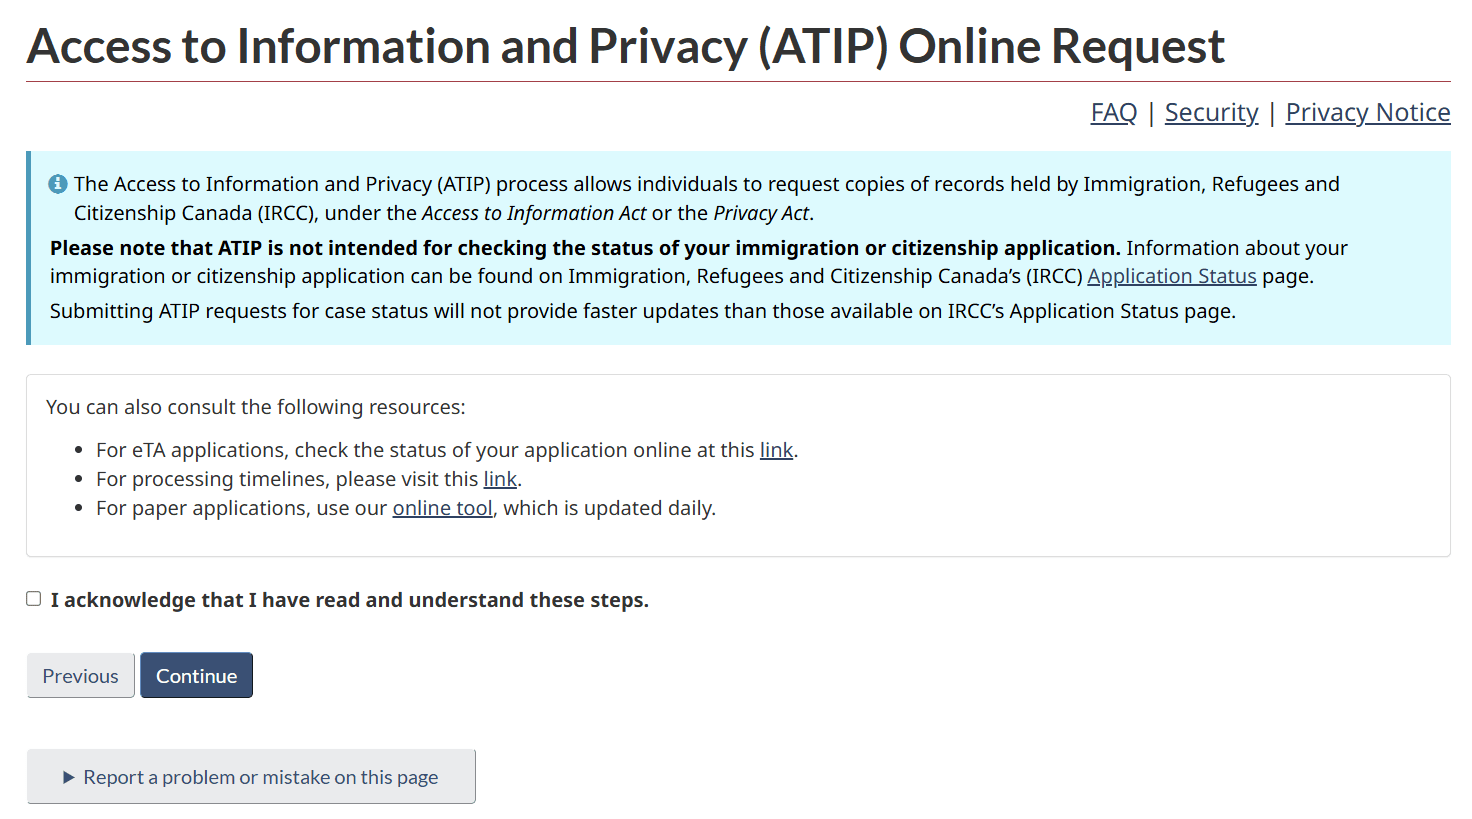
Acknowledge that ATIP is not a status-check tool
The next screen states plainly that ATIP is not intended for checking the status of an immigration or citizenship application, and that an ATIP request will not get you faster status updates. Tick "I acknowledge that I have read and understand these steps" and continue.
Step 3 of 24 · Start
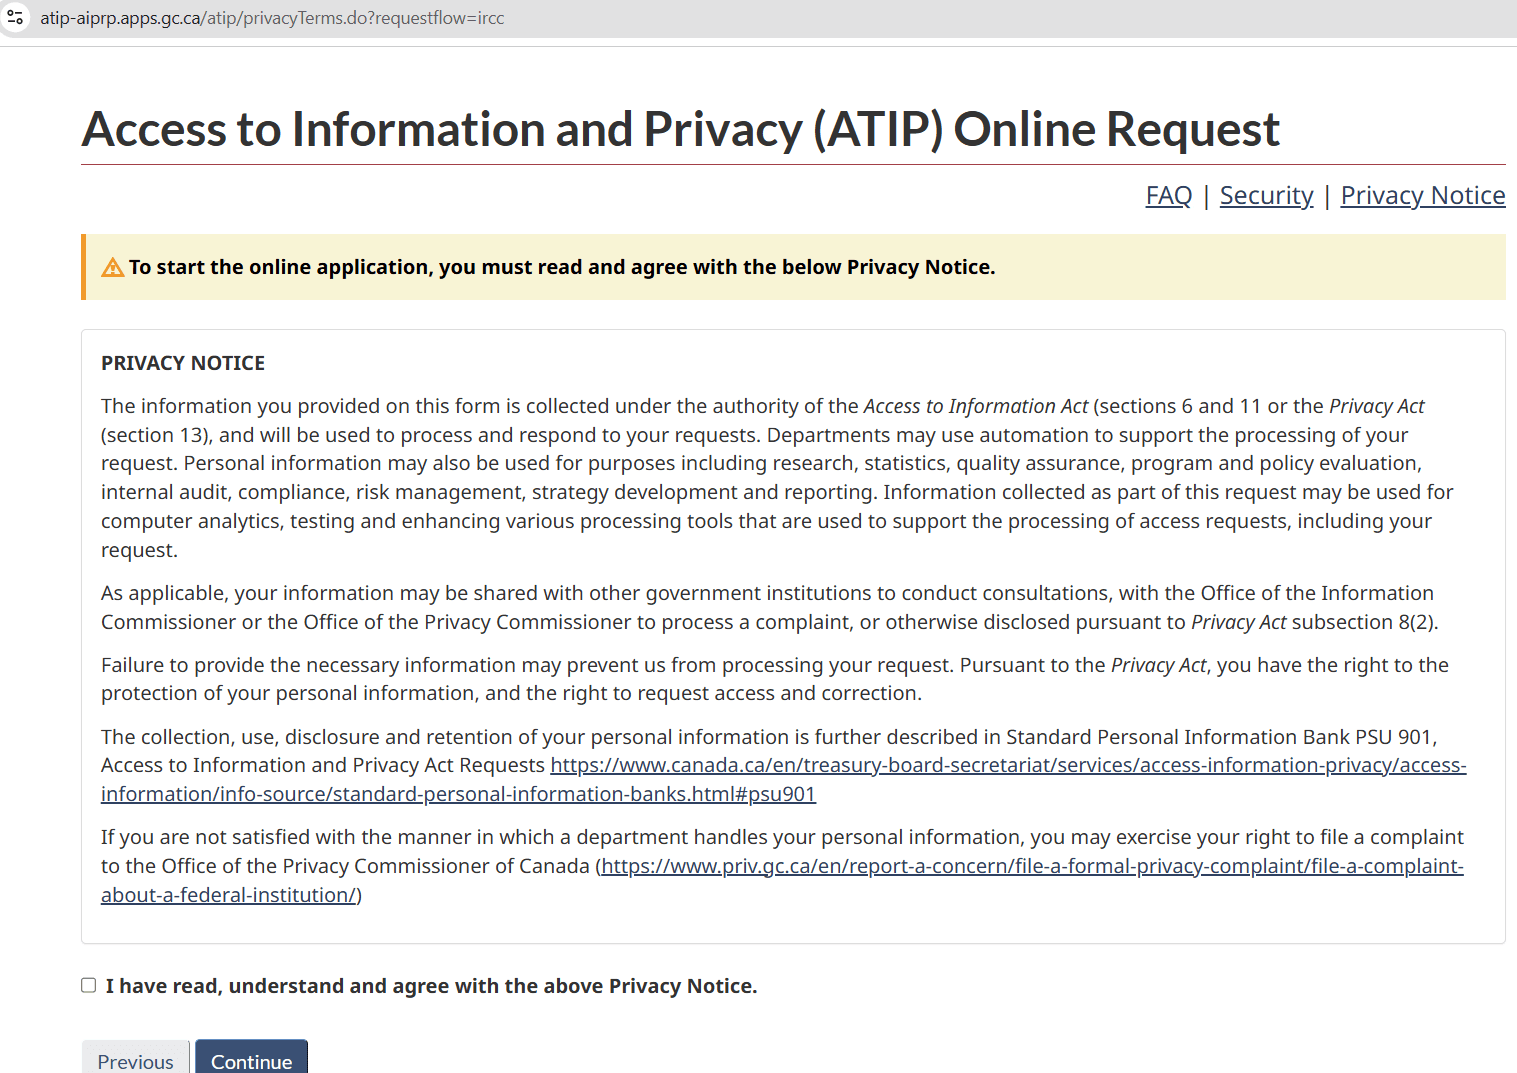
Read and agree to the Privacy Notice
The Privacy Notice explains that your information is collected under the Access to Information Act or the Privacy Act, that departments may use automation to process the request, and that you have the right to complain to the Office of the Privacy Commissioner. Tick the agreement box and continue.
Step 4 of 24 · Start
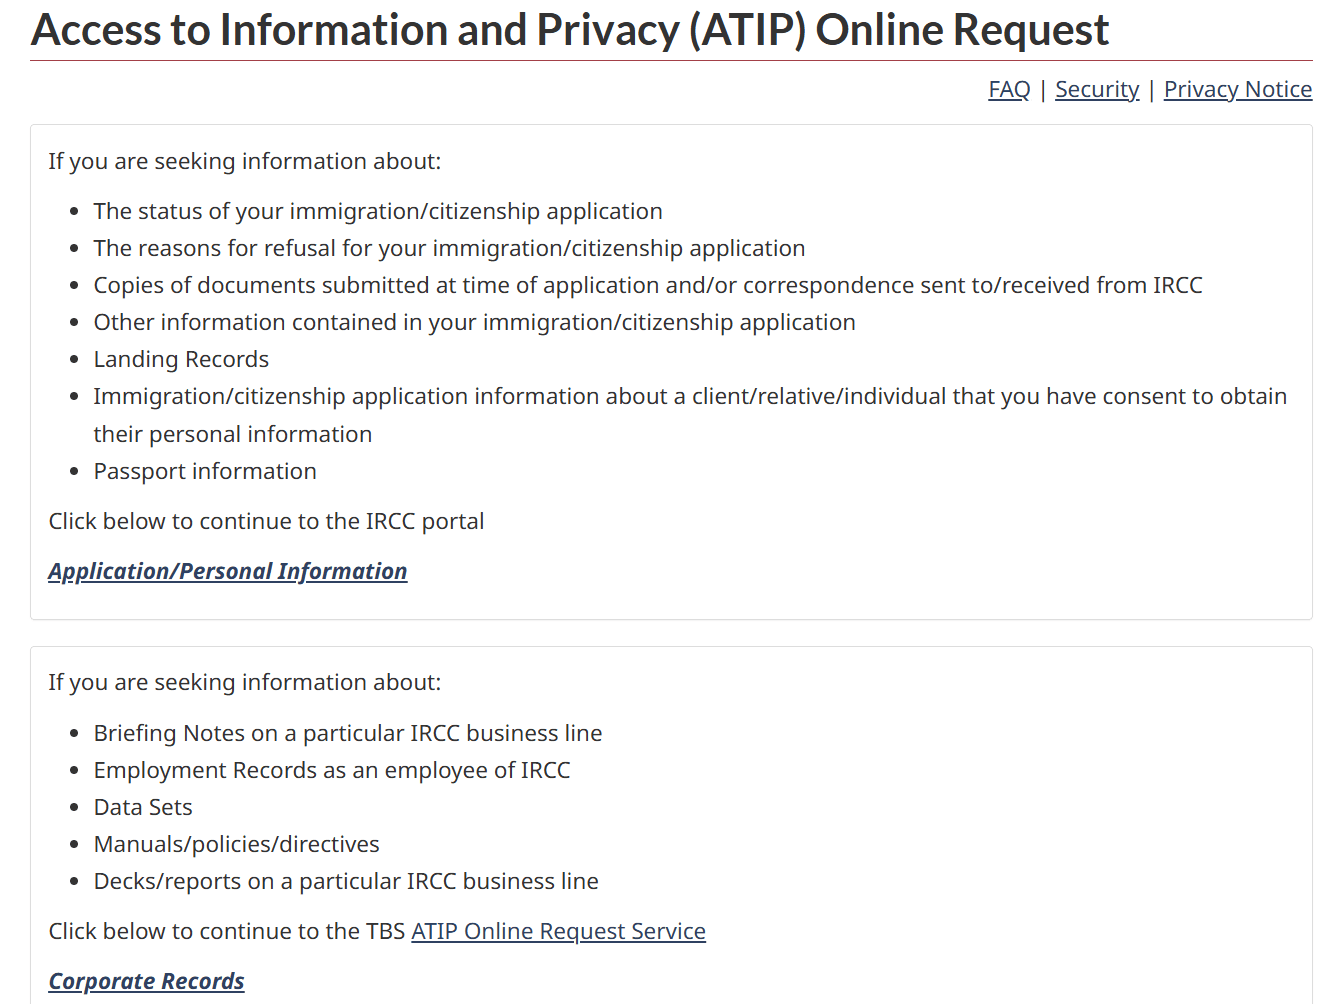
Choose "Application/Personal Information"
You are then asked what kind of information you are seeking. The first block lists exactly what you want — the reasons for refusal, copies of documents submitted, correspondence with IRCC, and other information in your immigration file. Click "Application/Personal Information". The "Corporate Records" block below it is for briefing notes, manuals and data sets.
Step 5 of 24 · Requester Information
Start the Requester Information stage
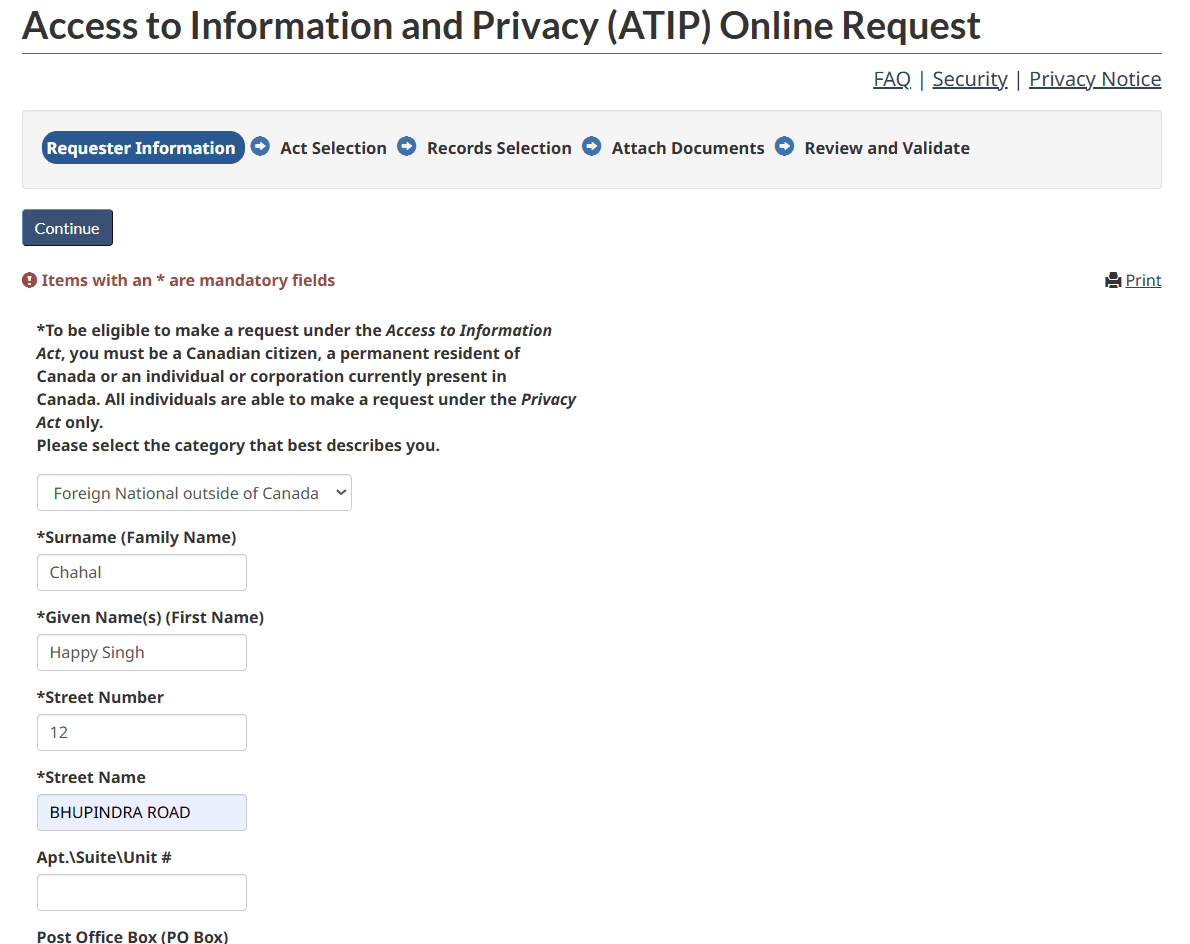
The five-stage wizard begins: Requester Information → Act Selection → Records Selection → Attach Documents → Review and Validate. Enter the requester's surname, given names and street address exactly as they appear on the identity document you will upload later.
The requester is the person filing the request. If you are requesting your own file, that is you — a Canadian relative is not required for a Privacy Act request.
Step 6 of 24 · Requester Information
Set your right of access correctly
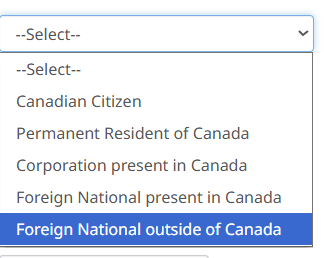
The category dropdown offers Canadian Citizen, Permanent Resident of Canada, Corporation present in Canada, Foreign National present in Canada, and Foreign National outside of Canada. An applicant in India selects "Foreign National outside of Canada".
This choice decides which Act you may use. Only citizens, permanent residents and people or corporations present in Canada can file under the Access to Information Act — but anyone, anywhere, can file under the Privacy Act for their own personal information. That is the route in this guide.
Step 7 of 24 · Requester Information
Add address, phone and email
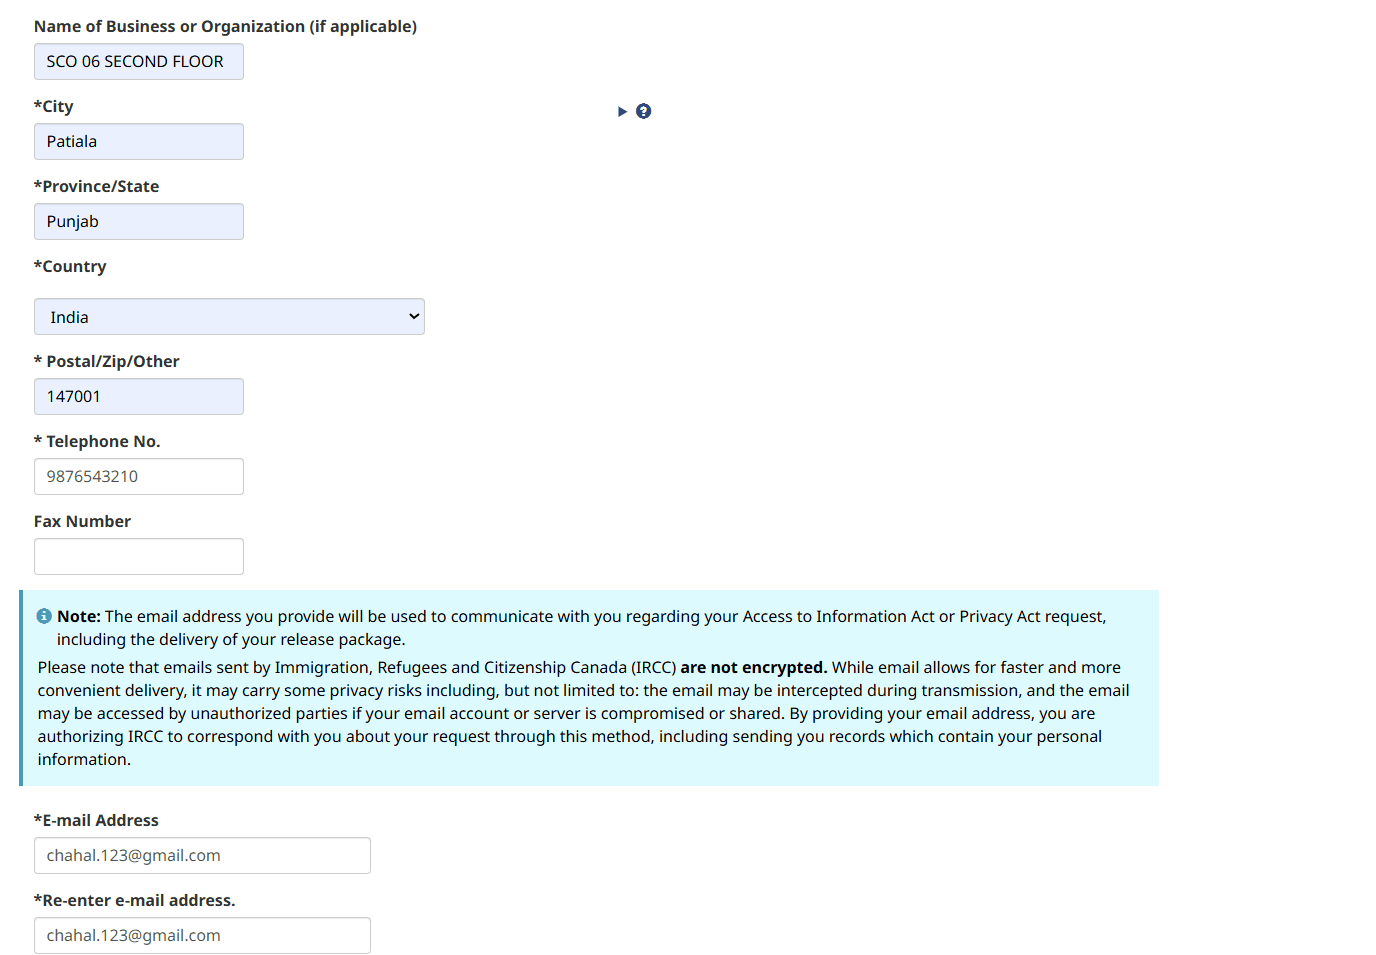
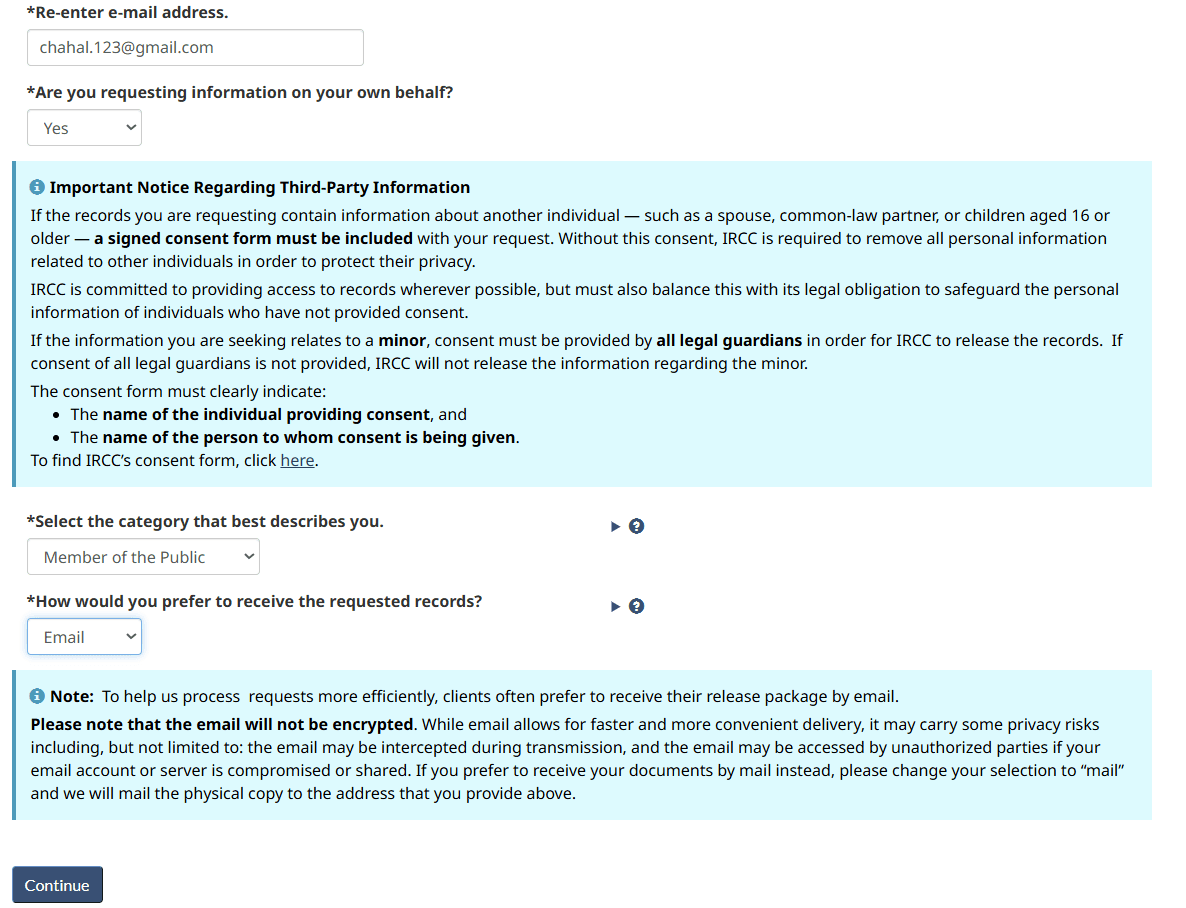
Complete city, province/state, country, postal code and telephone number, then your email address twice. IRCC warns on this screen that its emails are not encrypted and that by giving an email address you authorise IRCC to send you records containing your personal information that way.
Use an email account you personally control and will still have access to in two months. The release package lands in this inbox — not in your IRCC account.
Step 8 of 24 · Requester Information
Answer "on your own behalf?"
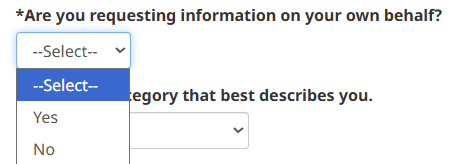
A Yes/No dropdown asks whether you are requesting information on your own behalf. Choose Yes if the file is yours. Choose No if you are requesting someone else's file — which then requires their signed consent.
Step 9 of 24 · Requester Information
Read the third-party consent rule, then set category and delivery
If the records contain information about another person — a spouse, common-law partner, or children aged 16 or older — a signed consent form must be included, or IRCC will strip out everything relating to them. For a minor, all legal guardians must consent. Then set "Select the category that best describes you" (an ordinary applicant is "Member of the Public") and how you want the records delivered.
Choose Email delivery unless you have a reason not to. Postal delivery to India adds weeks to a request that already takes about a month.
Step 10 of 24 · Act Selection
Submit under the Privacy Act — not the Access to Information Act
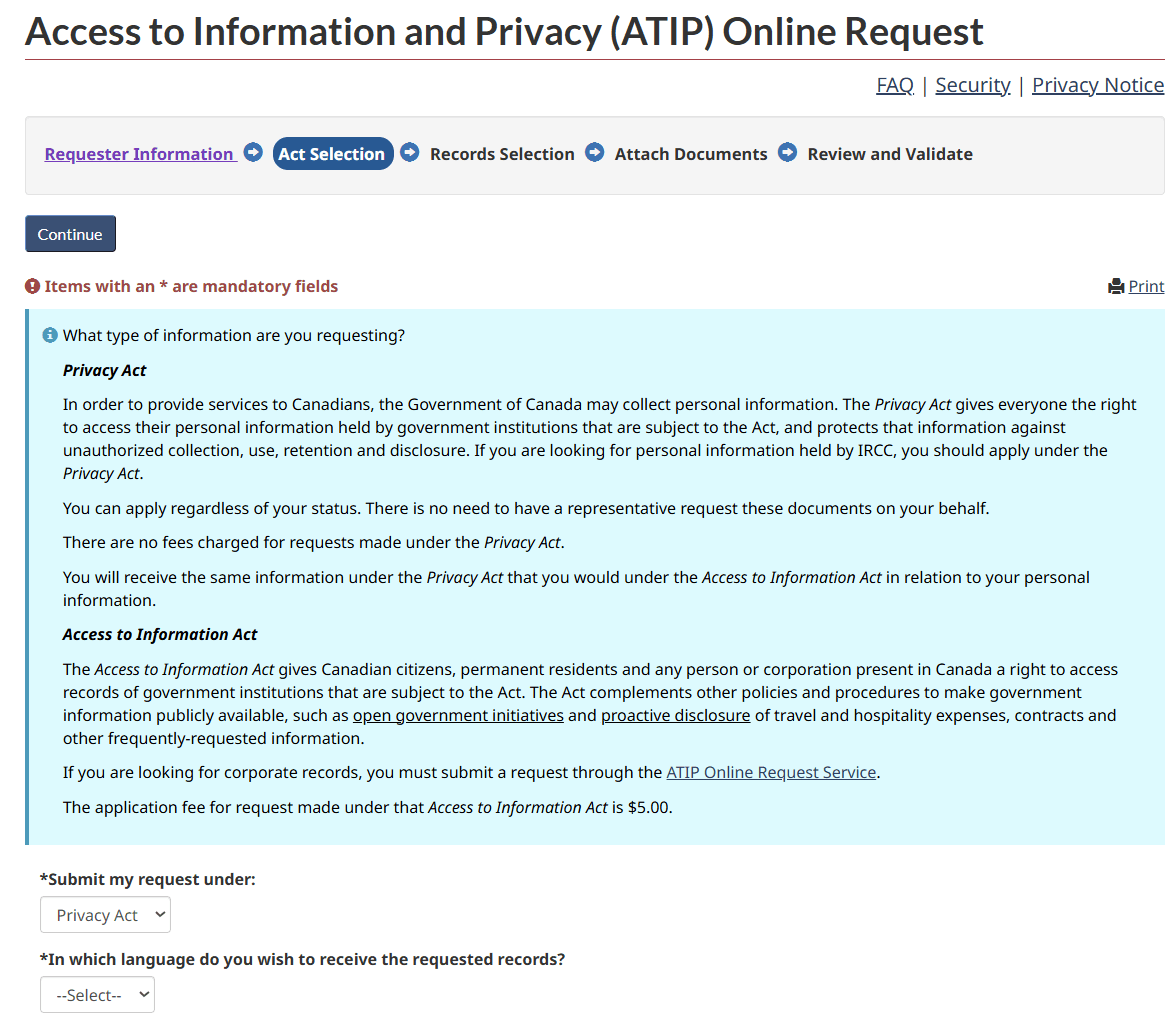
The Act Selection screen explains the difference. The Privacy Act gives everyone the right to their own personal information held by IRCC, there is no fee, you can apply regardless of status, and no representative is needed. The Access to Information Act carries a $5.00 application fee and is limited to citizens, permanent residents and people present in Canada. For your own visa file, select Privacy Act.
IRCC states on this very screen that you receive the same information under the Privacy Act as you would under the Access to Information Act in relation to your personal information. Paying the $5 buys you nothing here.
Step 11 of 24 · Act Selection
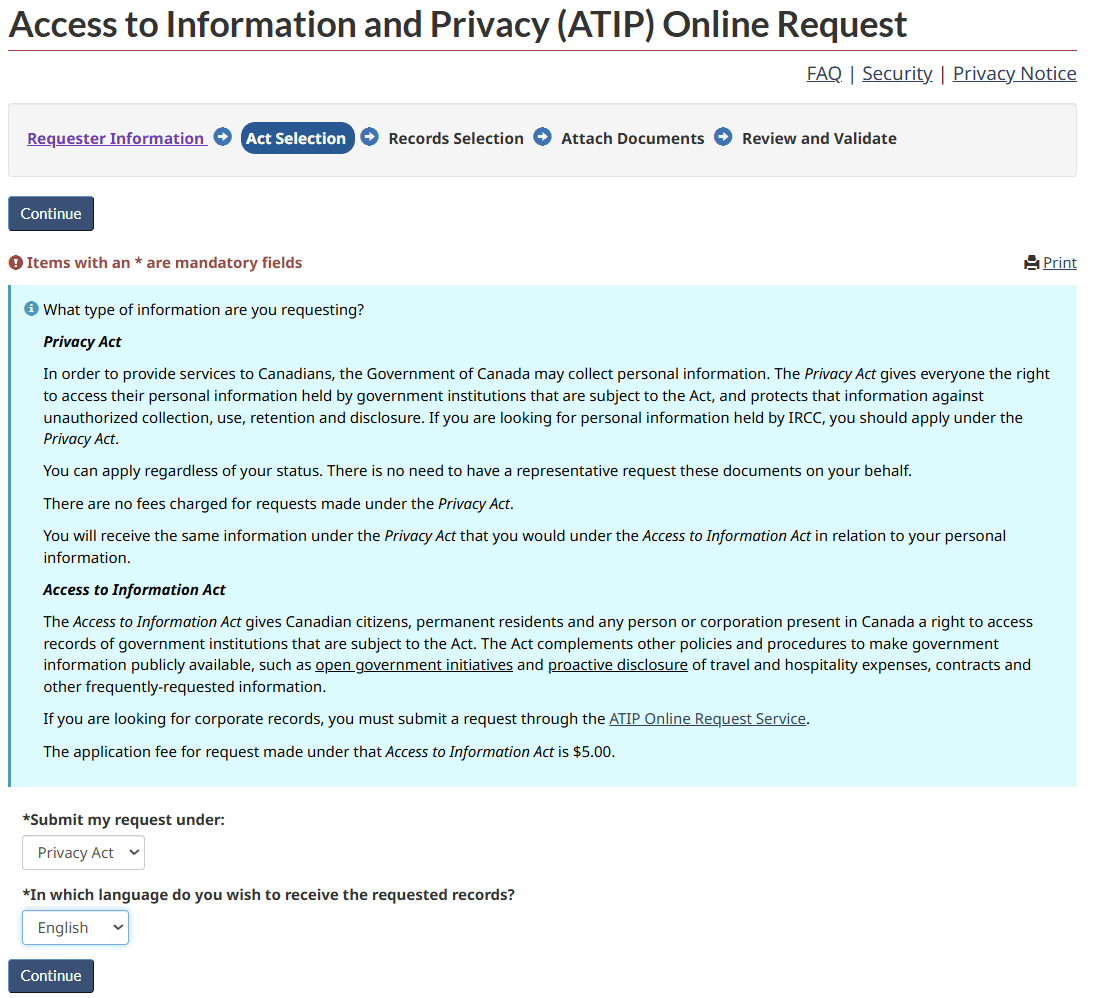
Choose the language of the records
Select the language in which you want to receive the requested records — English or French — and continue. GCMS notes for an Indian application are recorded in English.
Step 12 of 24 · Records Selection
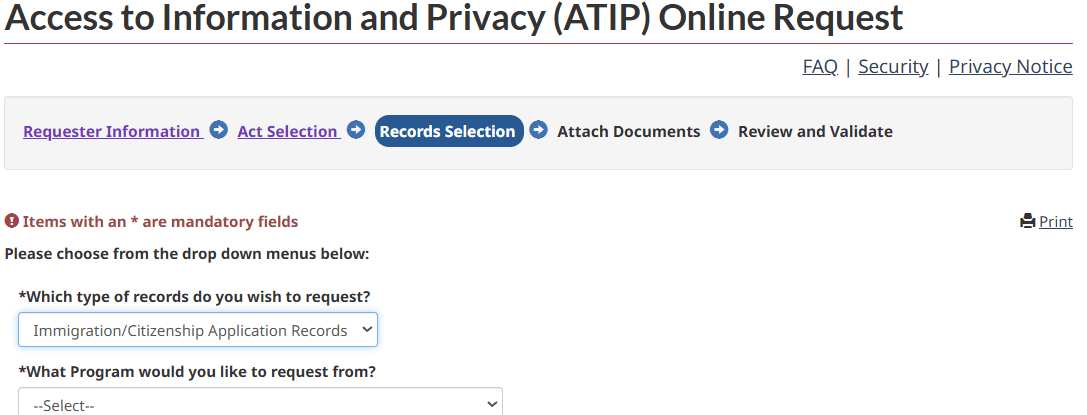
Choose the type of records
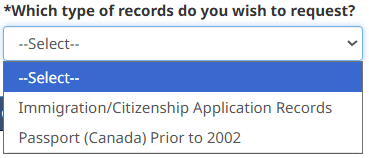
The Records Selection stage opens with "Which type of records do you wish to request?" — Immigration/Citizenship Application Records, or Passport (Canada) Prior to 2002. Choose Immigration/Citizenship Application Records.
Step 13 of 24 · Records Selection
Confirm the record type is set
With Immigration/Citizenship Application Records selected, a second dropdown appears: "What Program would you like to request from?"
Step 14 of 24 · Records Selection
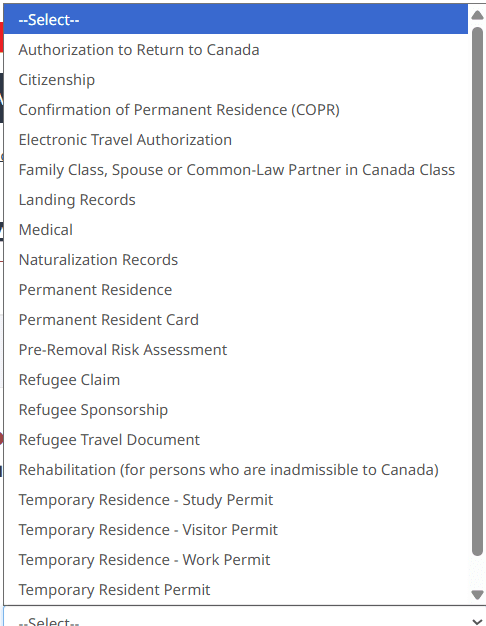
Pick the program your application was filed under
The program list covers the full range: Citizenship, Confirmation of Permanent Residence, Electronic Travel Authorization, Family Class, Landing Records, Medical, Permanent Residence, Permanent Resident Card, Pre-Removal Risk Assessment, Refugee streams, Rehabilitation, Temporary Residence — Study Permit, Temporary Residence — Visitor Permit, Temporary Residence — Work Permit, and Temporary Resident Permit. A refused visitor visa is "Temporary Residence - Visitor Permit"; a refused study permit is "Temporary Residence - Study Permit".
Pick the program you actually applied under, not the one you wish you had. The wrong program can return the wrong file — or nothing.
Step 15 of 24 · Records Selection
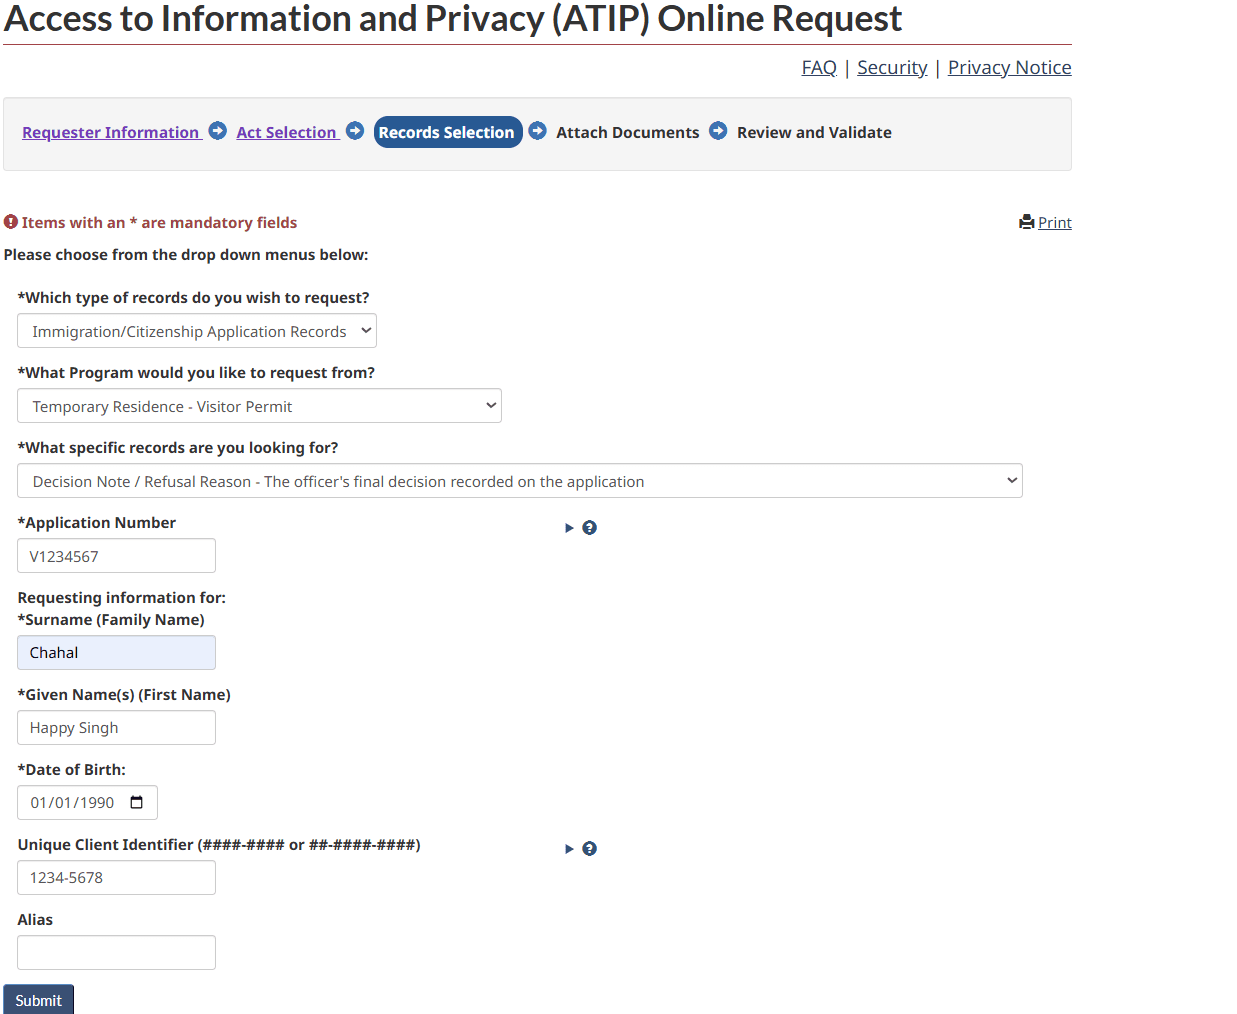
Choose how much of the file you want
"What specific records are you looking for?" offers three options: Decision Note / Refusal Reason (the officer's final decision recorded on the application), Application Summary (an electronic overview including processing notes), and Complete Application File (the summary report, all submitted documents, supporting materials and correspondence with IRCC).
If you are rebuilding a refused application, the Complete Application File is usually the one worth having — it shows what was actually submitted on your behalf, which is often not what the applicant believes was submitted. The Decision Note alone tells you the conclusion, not the file it was drawn from.

Step 16 of 24 · Records Selection
Enter the application identifiers
Fill in the application number, then the surname, given names and date of birth of the person whose file it is, plus the Unique Client Identifier (UCI) in the ####-#### or ##-####-#### format. The Alias field is optional. Everything must match the application exactly.
The application number and UCI are on your refusal letter and in your IRCC account. A single wrong digit is the most common reason a request comes back with no records found.
Step 17 of 24 · Records Selection
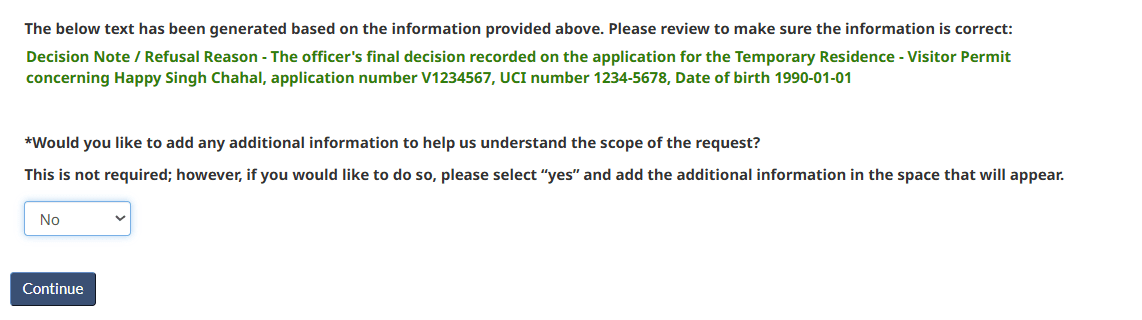
Review the generated request text
The portal writes your request sentence for you from the details above and shows it in green — the record type, the program, the applicant name, application number, UCI and date of birth. Read it once, carefully. You can also add free-text scope information here; for a standard notes request you do not need to.
Step 18 of 24 · Attach Documents
Attach the consent form where one is required
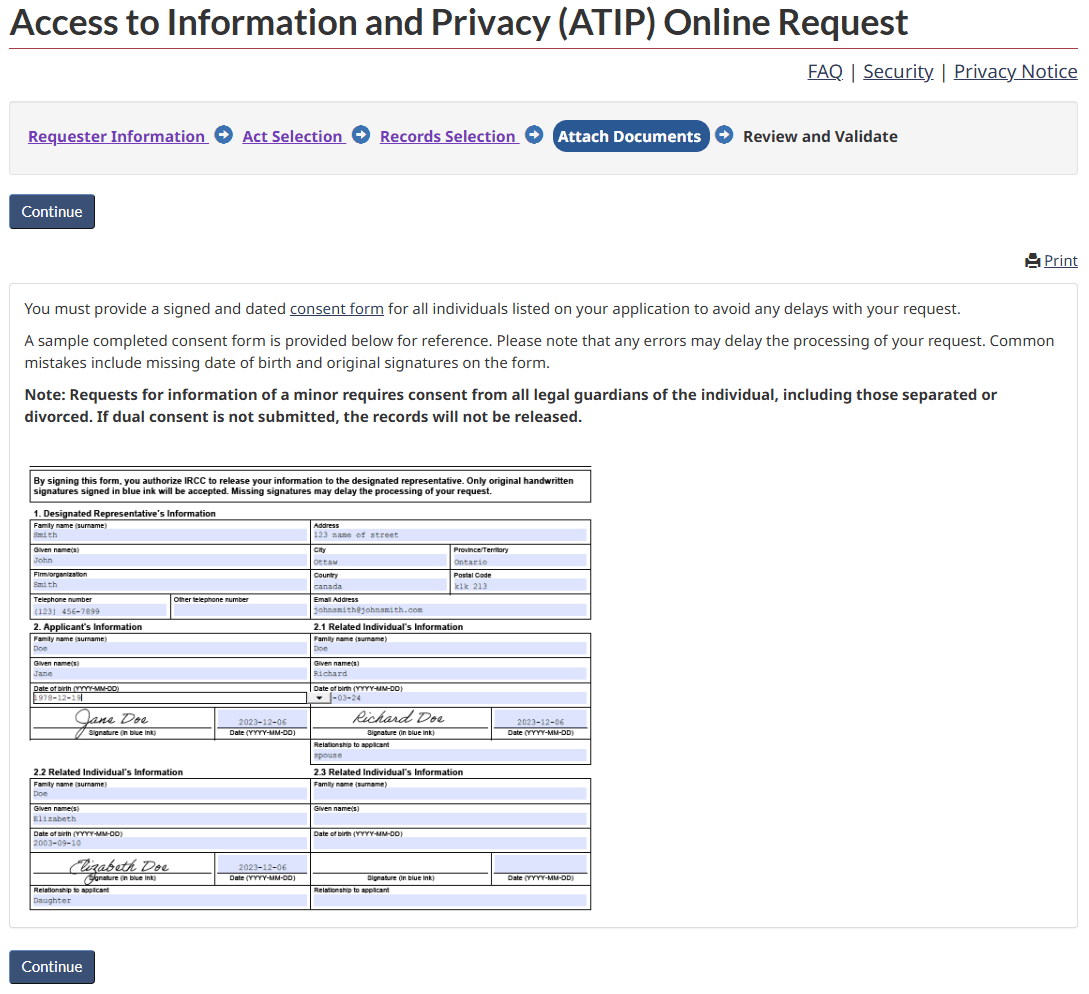
If the records concern anyone other than you, a signed and dated consent form (IMM 5744) must be attached for every individual listed. IRCC shows a completed sample on this screen. Only original handwritten signatures in blue ink are accepted, and consent for a minor must come from all legal guardians, including separated or divorced parents.
IRCC names the two mistakes that delay requests most: a missing date of birth, and a signature that is not an original handwritten one.
Step 19 of 24 · Attach Documents
Understand the identity requirement
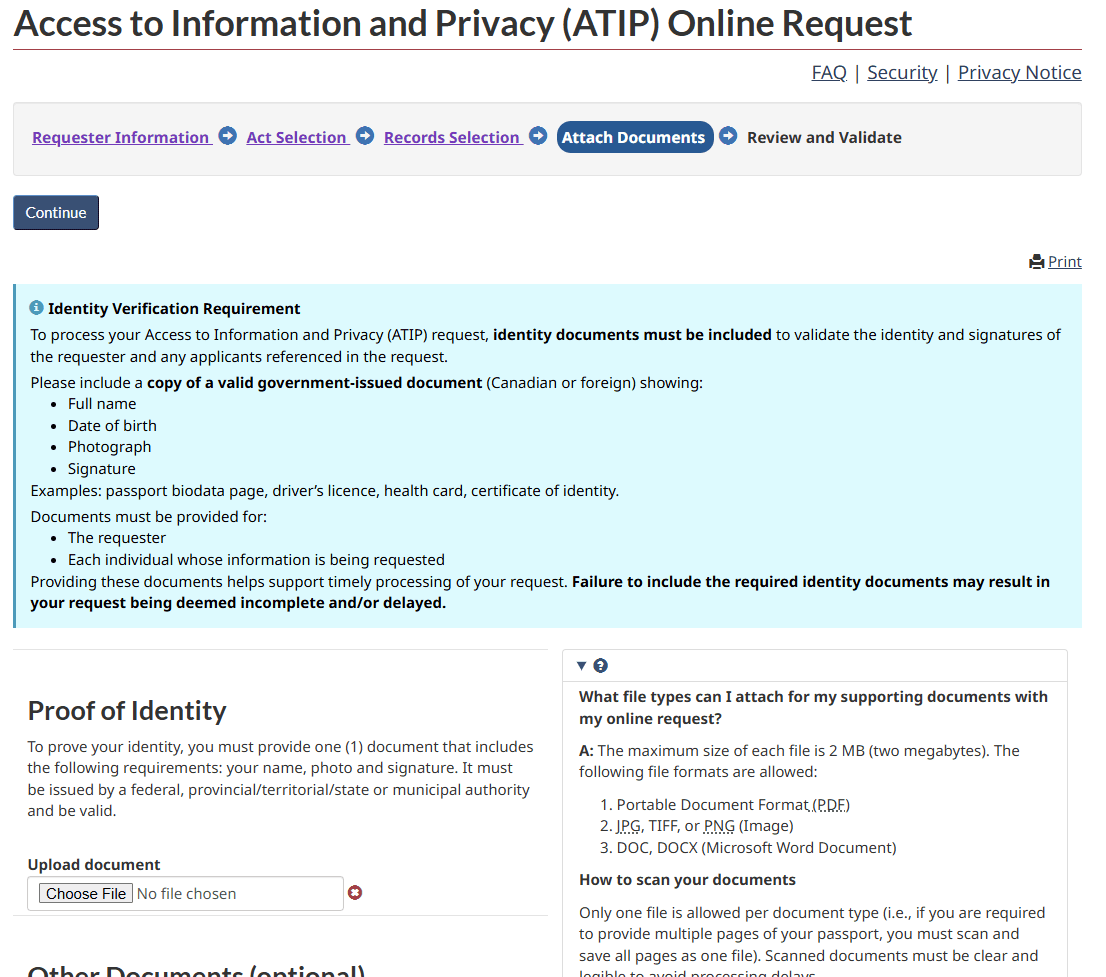
Identity documents must be included to validate the identity and signatures of the requester and everyone referenced in the request. The document must be government-issued (Canadian or foreign) and show full name, date of birth, photograph and signature — a passport biodata page, driving licence, health card or certificate of identity. It is required for the requester and for each individual whose information is being requested.
IRCC states that failing to include the identity documents may result in the request being deemed incomplete or delayed. This is the single most common own-goal.
Step 20 of 24 · Attach Documents
Upload proof of identity (and anything else that helps)
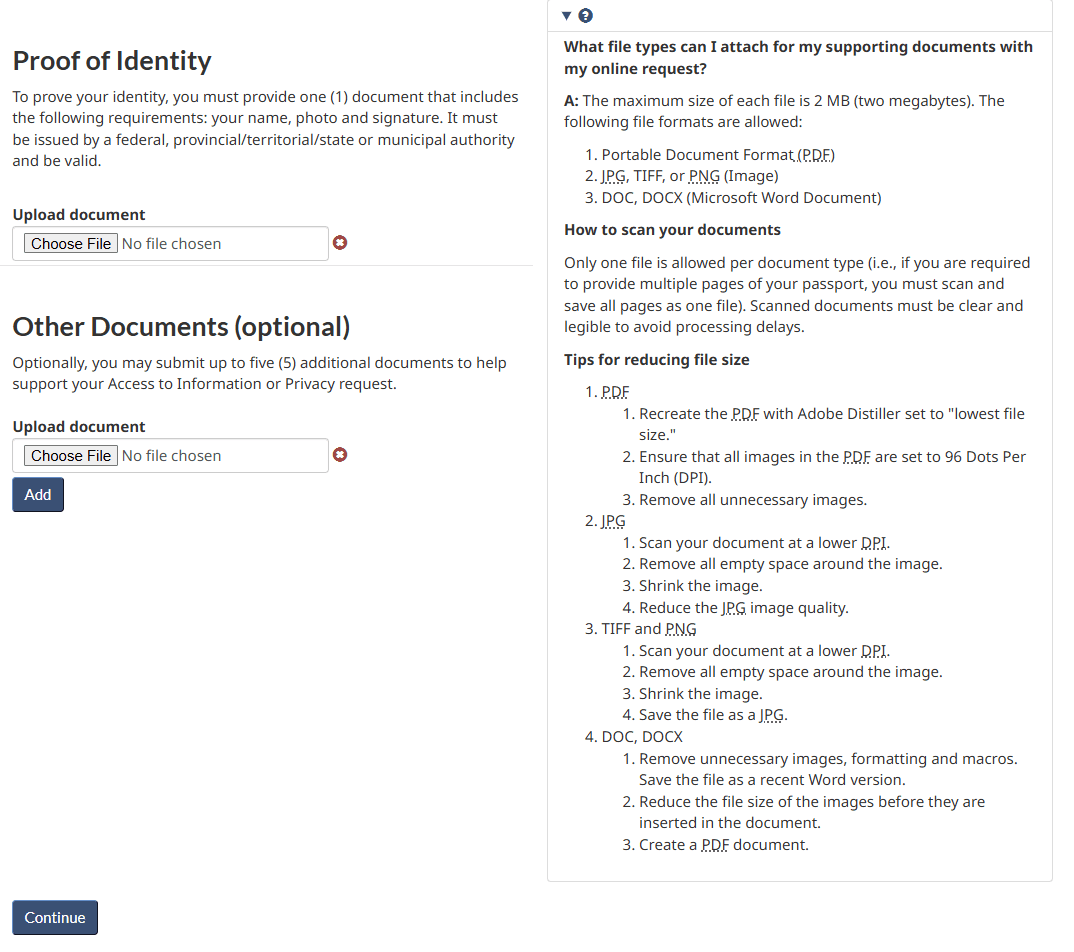
Upload one document proving identity, then optionally up to five further documents. Each file must be 2 MB or smaller, in PDF, JPG, TIFF, PNG, DOC or DOCX. Only one file is allowed per document type — so all passport pages must be scanned into a single file.
To get under 2 MB: scan at a lower DPI, crop the empty space, and save images as JPG rather than TIFF or PNG. A blurry scan to save space is a false economy — unclear documents cause processing delays.
Step 21 of 24 · Review and Validate
Check the requester summary
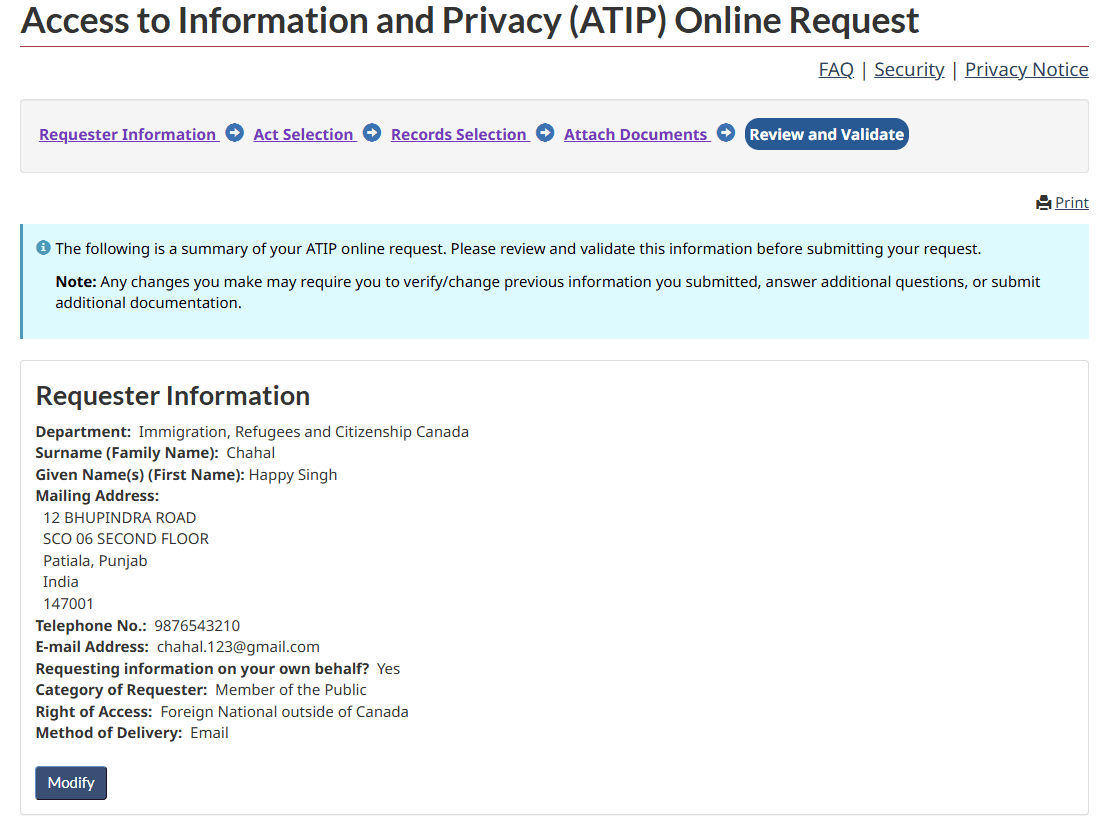
The review stage replays everything back to you: department, name, mailing address, telephone, email, whether you are requesting on your own behalf, requester category, right of access and delivery method. Each block has a Modify button.
Changing something here can require you to re-verify later stages or re-upload documents, so read carefully before you edit.
Step 22 of 24 · Review and Validate
Check the Act, records and attachments
The remaining blocks confirm the Act and language, the full records selection with the generated request text, and the files you attached. Verify the application number, UCI and date of birth one final time against your refusal letter.
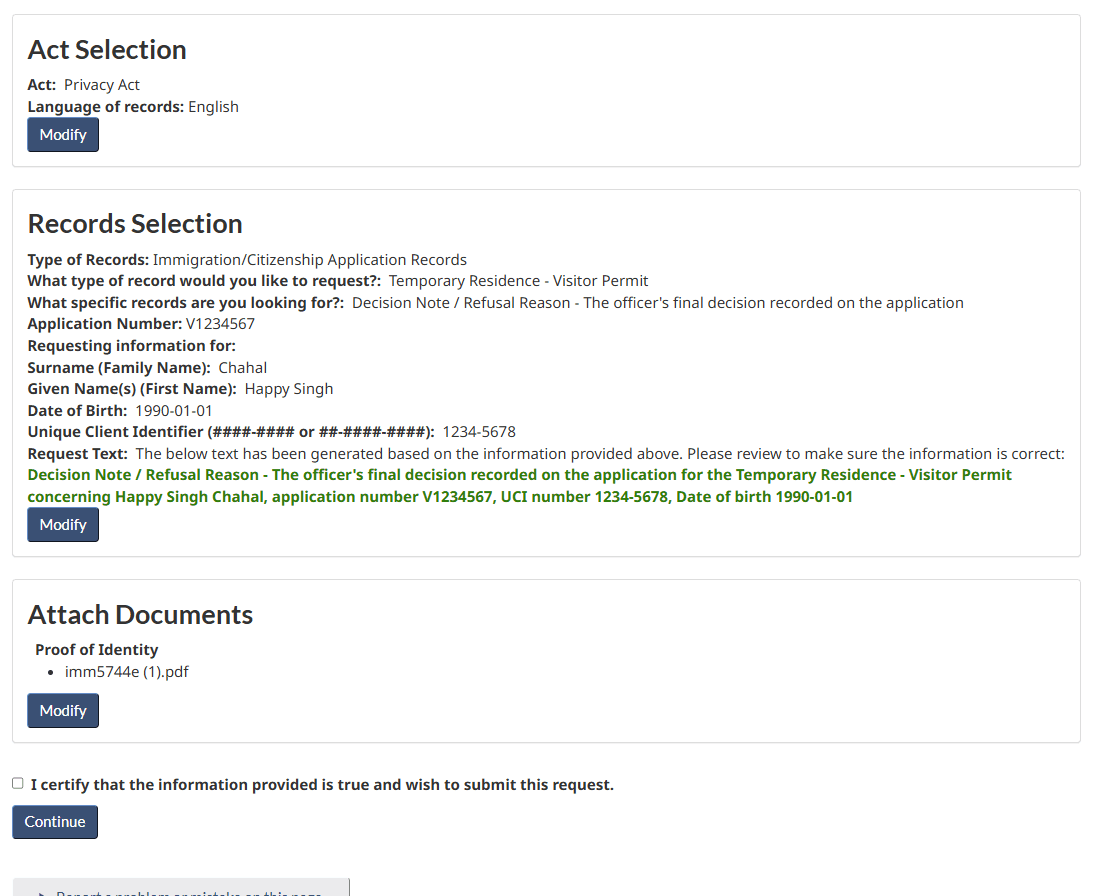
Step 23 of 24 · Review and Validate
Certify and continue
Tick "I certify that the information provided is true and wish to submit this request", then continue. This is a declaration to a federal institution — the certification is not a formality.

Step 24 of 24 · Review and Validate
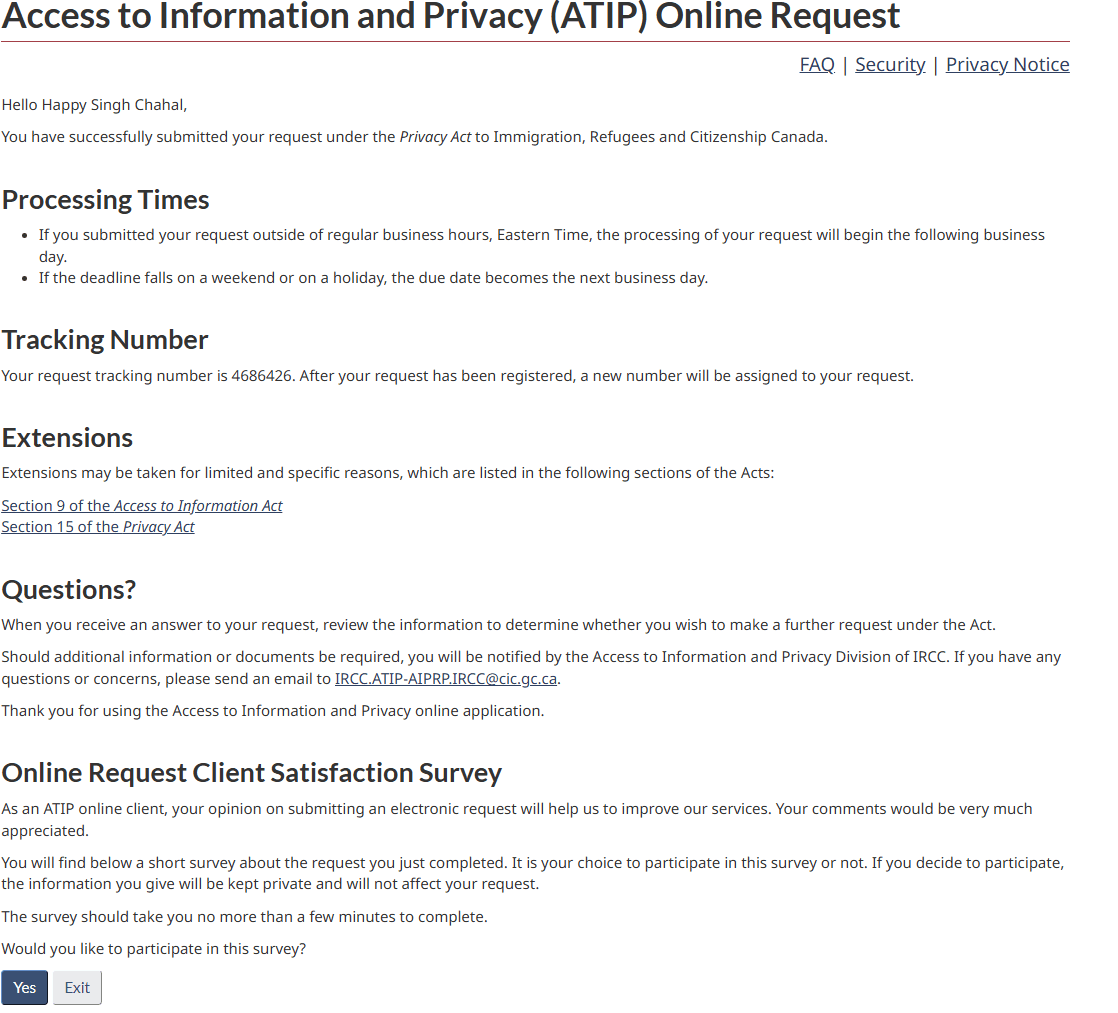
Save your tracking number
The confirmation screen gives you a request tracking number. A new number is assigned once the request is registered. Both Acts allow a legal response time of 30 calendar days from receipt, extendable for specific reasons set out in section 9 of the Access to Information Act and section 15 of the Privacy Act. Questions go to IRCC.ATIP-AIPRP.IRCC@cic.gc.ca.
Screenshot this page. The tracking number is how you chase a late response — and requests do run past 30 days.
What happens next.
30 calendar days, extendable
Both Acts allow a legal response time of 30 calendar days from receipt. That can be extended for limited, specific reasons — a large volume of records, necessary consultations, or translation. Requests submitted outside Ontario business hours start the next business day.
It arrives by email, unencrypted
If you chose email delivery, the release package lands in the inbox you gave — as a PDF, usually running to dozens of pages of officer entries, document lists and internal correspondence. Parts may be blacked out under Privacy Act exemptions; that is normal and not a mistake.
If it is late, chase it with your tracking number
Write to IRCC.ATIP-AIPRP.IRCC@cic.gc.ca quoting the tracking number from the confirmation screen. If the delay or the response is unsatisfactory, a complaint can be made in writing to the Office of the Privacy Commissioner of Canada — there is no cost to have a complaint investigated.
Then comes the hard part
Notes are written in officer shorthand and reference internal codes. Reading them is where most people stall — and where reapplying blind starts. Work out which concerns are answerable with new evidence and which are not, before you file anything again.
Got your notes and can’t read them?
Send them over. You skip the retrieval tier entirely and pay only for the interpretation and the reapplication roadmap.
FAQs
- Is it free to request your own GCMS notes?
- Yes. A request under the Privacy Act for your own personal information held by IRCC carries no fee. Only a request under the Access to Information Act has a $5.00 application fee — and IRCC states you receive the same information about yourself under either Act. Anyone charging you a "government fee" for a Privacy Act request is not passing on a real cost.
- Can I apply from India, or do I need a Canadian citizen to file for me?
- You can file it yourself from India. Under the Privacy Act, Canadians and foreign nationals, regardless of where they are located, can request their own personal information held by federal institutions — the portal has a "Foreign National outside of Canada" right-of-access option. A Canadian citizen or permanent resident requester is only needed for an Access to Information Act request.
- How long do GCMS notes take to arrive?
- Both Acts set a legal response time of 30 calendar days from receipt of the request. Extensions are allowed for specific reasons set out in section 9 of the Access to Information Act and section 15 of the Privacy Act — for example when a large volume of records has to be searched, or consultations are needed. In practice most requests land in roughly 30 to 45 days.
- Should I request the Decision Note or the Complete Application File?
- The Decision Note gives you the officer's final decision on the application. The Complete Application File gives you the summary report plus everything submitted, the supporting materials and the correspondence with IRCC. If you are rebuilding a refused case — especially one an agent filed for you — the complete file is usually worth having, because it shows what was actually submitted rather than what you were told was submitted.
- What documents do I need to attach?
- A government-issued identity document showing full name, date of birth, photograph and signature — a passport biodata page is the usual choice — for the requester and for each person whose information is being requested. If the records concern anyone other than you, you also need a signed and dated consent form (IMM 5744) with an original handwritten signature. Each file must be 2 MB or smaller.
- Do I still need a consultant if I can file this myself?
- Not to file it. Filing is a form. The part that is hard is reading forty pages of officer shorthand, working out which concerns are answerable and which are not, and deciding honestly whether to reapply, wait or change pathway. That is what we charge for — and if you have already pulled your own notes, bring them to us and skip the retrieval tier entirely.
Screens and rules verified against the live IRCC ATIP portal on 14 August 2026. The Government of Canada redesigns this service periodically — if a screen no longer matches, follow the on-screen wording, not ours. Educational information, not legal advice.
Refused and still working out why? Read the 50 reasons a Canadian visitor visa gets refused →
Start here · One message away
Don’t leave your visa to chance.Let’s build a stronger file together.
- Honest assessment
- Fixed all-in fees
- No handovers between staff
- Licensed in Patiala
Let’s discuss your case
Message us on WhatsApp — share your visa goal and a consultant from our Punjab-licensed consultancy takes it from there. No forms, no call centres.